• Blog
  • Recipes
  • Supper Club
  • Parties
  • About
Menu

Fig + Berrie

Street Address
City, State, Zip
Phone Number
a gathering of recipes, party ideas, and pictures to inspire.

Your Custom Text Here

Fig + Berrie

  • Blog
  • Recipes
  • Supper Club
  • Parties
  • About

Pear and Cranberry Turnovers

October 15, 2016 Ally Wankier
IMG_6418.jpg
IMG_6344.jpg

There's nothing like Fall to get you in the mood to bake all the things! I think it has to be one of my favorite seasons... I say that about every season, but really, Fall is up there. So, with these cold, wet days we've had lately I am in the mood for cozy, warm treats. These turnovers are just that, cozy and warm. Do you remember those cherry turnovers that came in a little box in the dairy section you could buy and they would puff up so pretty in the oven and then you would drown them in the packet of white sweet icing? Anyone?? Well anyway, my mom used to make those for me and my brother when we were little, and then one day they disappeared. So in honer of that memory, here are some turnovers that remind me lots of those, but with Fall flavors. They are so easy, with a ready made dough, so all you have to do is make the filling. Also, pears....  I always forget how delicious they are until I eat one again - they are so good! The cranberries are so pretty and add that cherry taste/feeling I remember from my childhood. All in all, these are delicious and could be making your kitchen smell like Fall in no time. 

IMG_6293.jpg
IMG_6276.jpg

Pear and Cranberry Turnovers

-makes 12 turnovers

  • 3-4 ripe pears 
  • 1/3 cup cranberries 
  • 1/3 cup sugar
  • 2 tablespoons brown sugar 
  • 1/4 cup water 
  • 1 teaspoon cinnamon 
  • pinch of salt
  • 1-2 tablespoons flour
  • frozen puff pastry 
  • 1 egg

Glaze 

  • 1 cup sugar 
  • 1-3 tablespoons of milk 

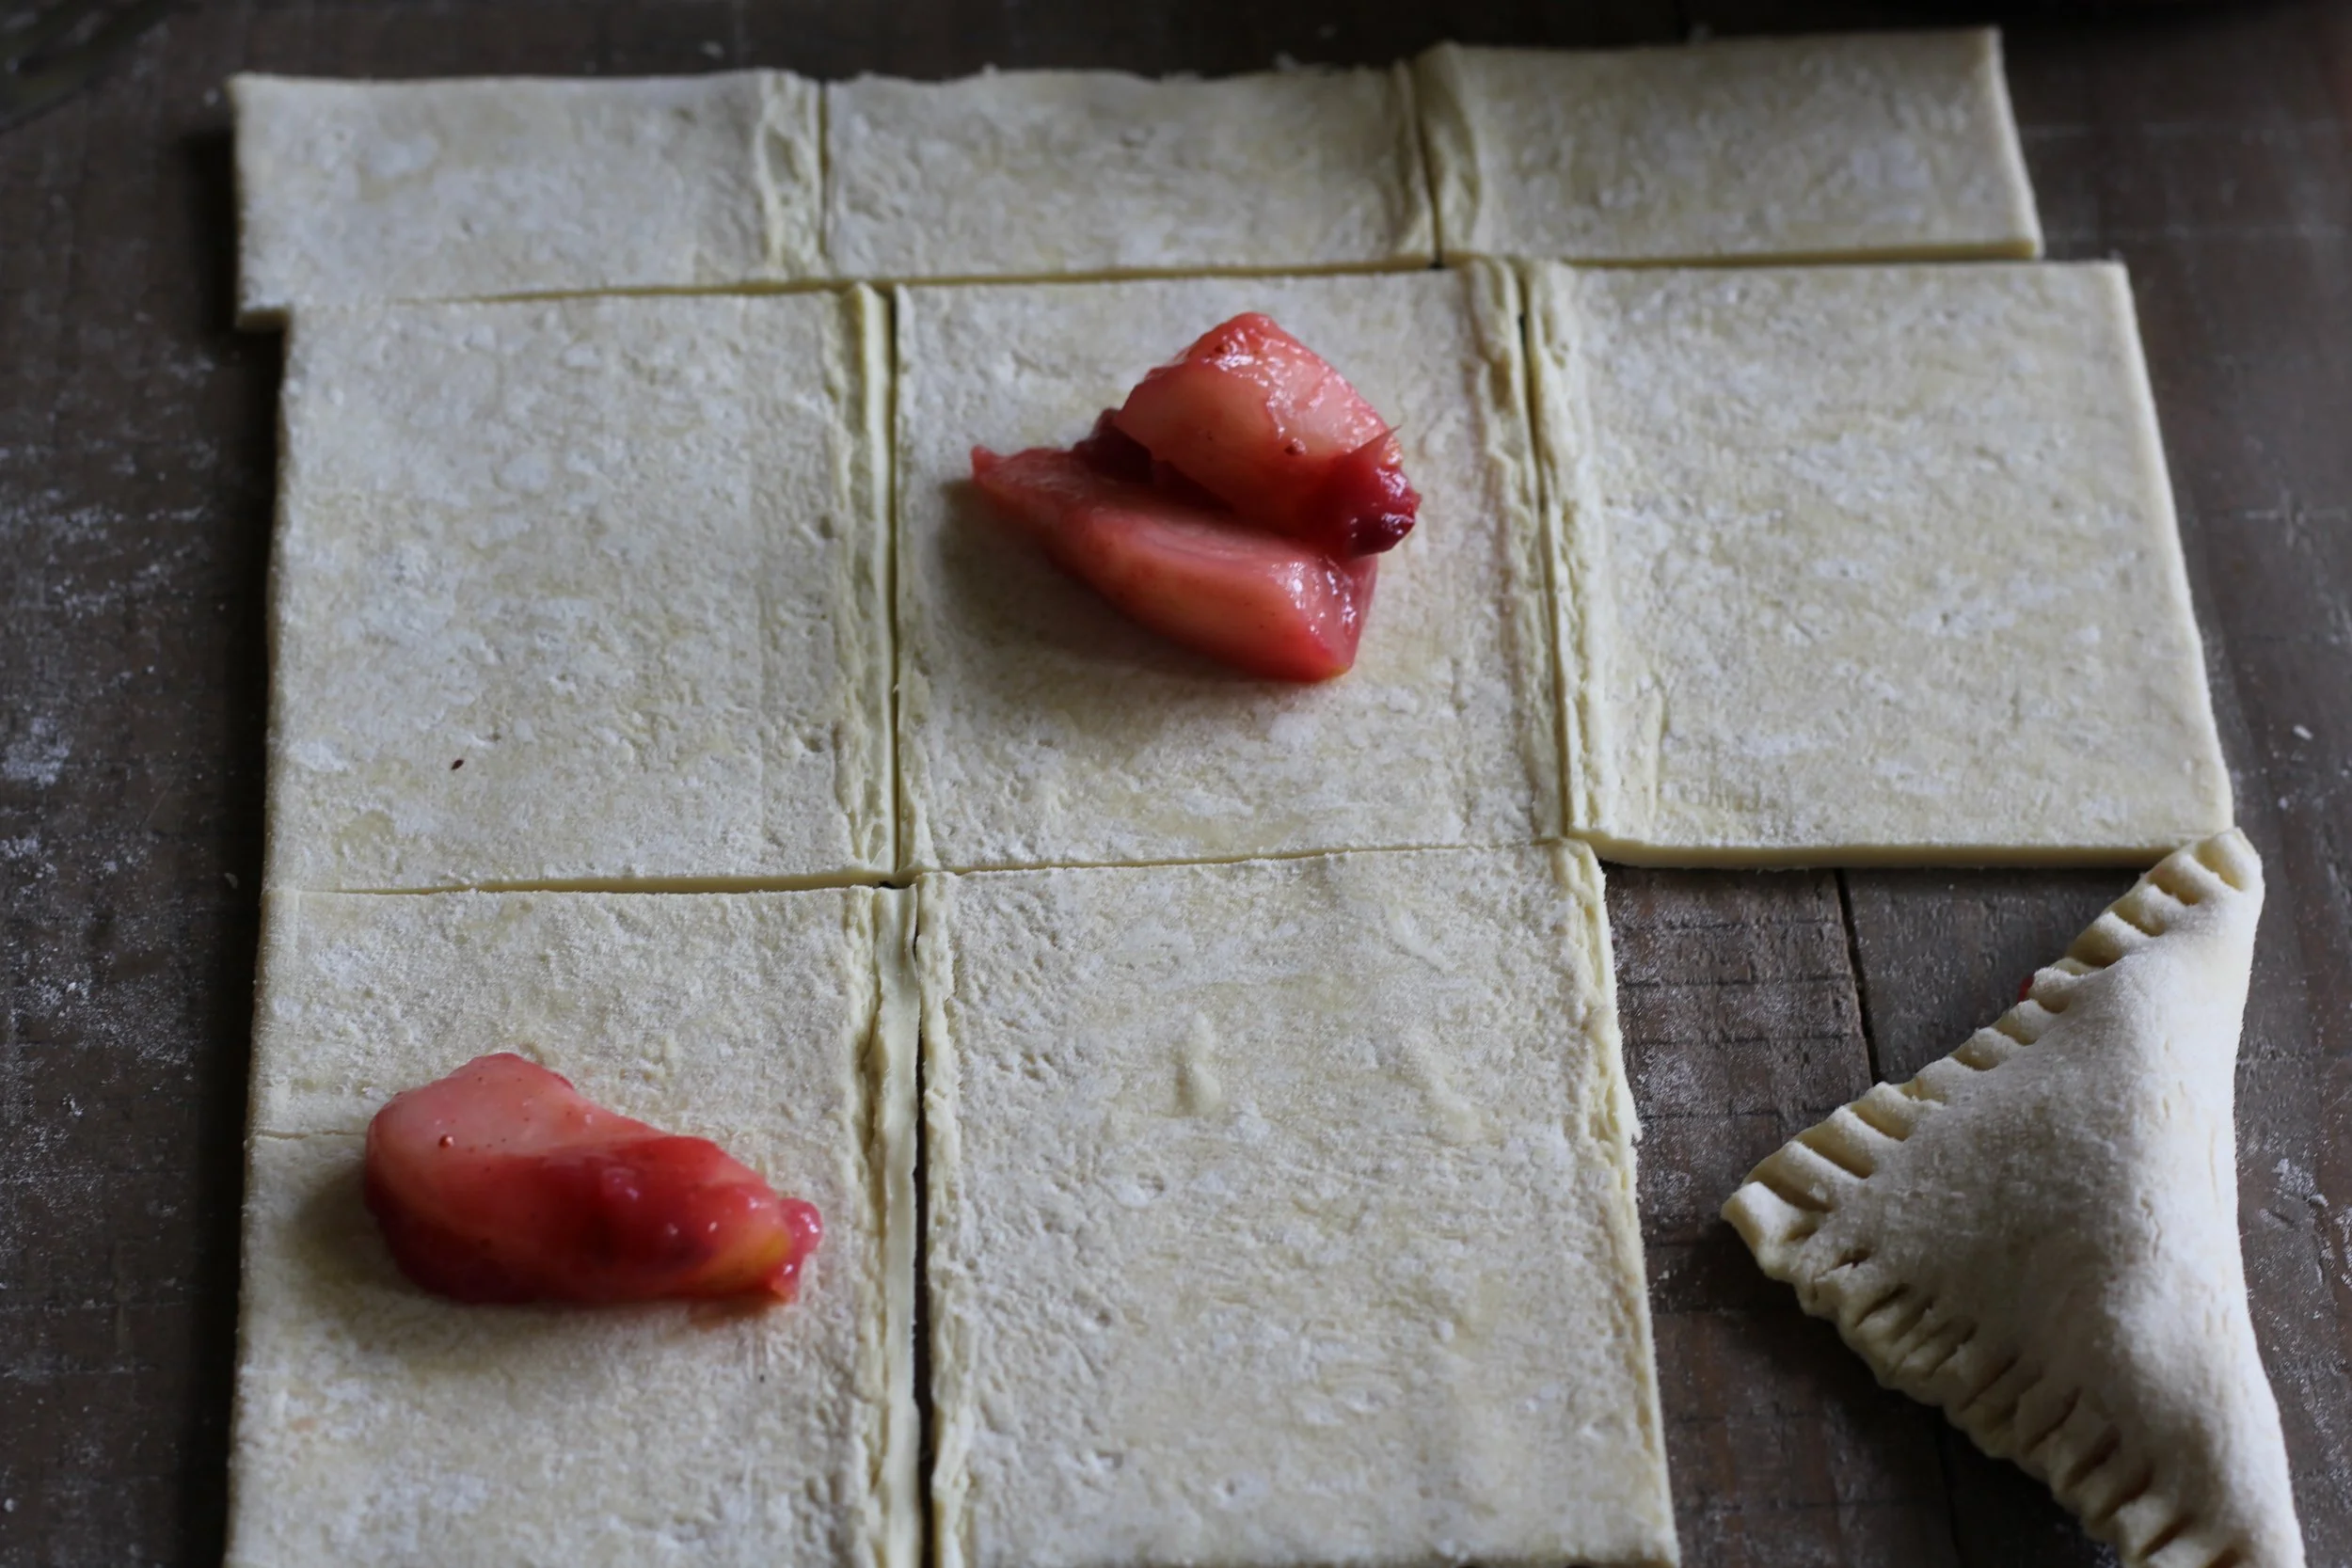
To start, preheat your oven to 375 degrees and peel your pears, then cut them into bite size pieces. Remember, if the pears are too big they won't fit in the turnovers. Throw the pears in a pan with the cranberries and add the water and sugar. Cook over medium high heat for about 5 minutes, then add the cinnamon and salt and cook for another 5-10 minutes. Stir often, until the pears are just softened. Lastly, stir in the flour and turn heat to high. It should take just a couple minutes before you see the juices thickening into a syrupy sauce, then turn off the heat. Let the filling cool while you unfold your pastry and prepare the dough. When you unfold the pastry it will be a rectangle shape. Cut about an inch or two off the top so the dough is a square, then cut it into 3 strips vertically and in half across so you have 6 little squares to fill. Then, spoon a tablespoon or so of filling into each one, fold diagonally and crimp with a fork. 

Set your turnovers on a baking sheet. I usually do 6 to a sheet just so they have room to puff. You will need both sheets of puff pastry to make the total twelve. Whisk your egg up with a few drops of water and brush it liberally over the tops of the turnovers. Bake them in an oven at 375 degrees for 18-20 minutes, or until golden brown.

Once they are out of the oven, wait 10 minutes before glazing - if they are too warm, the glaze won't stick. To make the glaze, just mix your sugar and milk. Add just a tablespoon of milk to start and keep adding until its just combined. You are going for a thick glaze, so don't add too much milk. Also, in my opinion, the more glaze the better, just like when I was a kid... (Now eat immediately, while they are still warm and gooey on the inside!) You will have extra filling, which is great over ice cream, pound cake, or just eaten with a spoon!

IMG_6374.jpg
IMG_6418.jpg

*** A note about puff pastry- you can find it in the frozen foods isle. I always use Pepperidge Farms brand. It comes with two sheets of pastry that have to be thawed overnight in the fridge, or I set it out on the counter a few hours before I make something to thaw a little faster. It's a great easy dough that is my 'go to' when I need flakey layers of puffy, buttery goodness! 

In recipes, sweets Tags fall, dessert, fruit, hand pies, recipes
Comment

Dutch Baby with Caramel Apples

September 10, 2016 Ally Wankier

Well it's been a wild summer and this blog has definitely been a bit neglected, but I have missed it so much! Now that I'm back in school I'm hoping to start back up with regular posts and get in the kitchen a lot more. These last couple days in SLC have been a dream..70 degree weather and sunny skies, its got me in the mood for fall. So coming to you after a three month hiatus, I bring a delicious Dutch Baby! This recipe is so easy and probably something we've all made before - it's basically a German pancake, but in a skillet, so you get 360 degree crispy edges, and I just like how it looks. After researching many Dutch Baby recipes I came up with my own perfect mix that I think is just right. Enough eggs to give it puffiness, but not so many that it tastes like an omelet..not my favorite. This Dutch Baby is perfect on its own with some sugar and jam..., but i couldn't stop there... Since it's been feeling like fall, and I happened across these really pretty apples I decided to add a little caramel apple sauce...and it was the best thing I think I've ever done! Totally exceeded my expectations - so good! And don't be scared off by the word caramel - it's just brown sugar, that's it, but it is oh so good. So go make this now! For breakfast, lunch, dinner, or just because... in 20 minutes you could be eating this fluffy pillow of goodness!

Dutch Baby 

  • 3/4 cup flour 
  • 3/4 cup whole milk 
  • 3 eggs
  • 1 teaspoon vanilla 
  • 1 teaspoon salt 
  • 1 Tablespoon sugar 
  • 3 tablespoons butter

In a blender, crack the eggs and add all the ingredients except the butter. Mix on high for about thirty seconds until everything is smooth and there are no lumps. You don't have to do this in a blender, it just ensures there are no lumps of flour which helps the Dutch Baby rise better. Let the batter sit for 10 - 15 minutes while you preheat the oven to 425 degrees. This helps the batter meld together and the ingredients get to know each other. Put your skillet in the oven as it's preheating till it's really hot, then remove it (with a hot pad!!!) and add 3 tablespoons of butter - it will melt right away. Pour your batter in the hot buttered pan and stick it in the oven for 17-20 minutes. Serve immediately with powdered sugar, or your caramel apples.

IMG_6079.jpg
IMG_6098.jpg

While your Dutch Baby is puffing up, you can whip up the apple topping. It's so simple - all you need is: brown sugar, butter, cinnamon, and apples.

Apple Caramel 

  • 2 medium sized apples or 1 large
  • 2-3 tablespoons butter 
  • 1/4 cup brown sugar (or a little more if you feel like it)
  • 1 teaspoon cinnamon

To start, cut your apples thinly, you want them to soften quickly.  Throw the butter in a skillet over medium heat and let it melt, then add your sliced apples. Sauté the apples in the butter for about 3 minutes before adding the sugar and cinnamon, so they can begin to soften. Keep the apples bubbling away at medium heat with the sugar until they are well coated and a thin sauce develops, about 5 minutes. Turn the heat off and let them sit until the Dutch Baby is ready.

Once the Dutch Baby is out, top it with the apples and serve immediately. If you wait to serve, it will begin to lose some of its puff, but it will still taste great. I like to serve it with fresh whipped cream, but you don't really need it - the caramel apples do just great on their own. Enjoy this for a quick fall dessert, breakfast, or snack and you won't regret it! 

In recipes, breakfast Tags fall, pancake, breakfast
Comment

Chicken Pot Pie with Puff Pastry Crust

October 13, 2015 Ally Wankier

It's finally starting to feel like Fall! The weather is cooling off and the leaves are beginning to turn, and it is time to return to the kitchen and cook up cozy warm meals for a long winter ahead. This chicken pot pie is perfect for that, with a store bought puff pastry crust and a single pie dish, it's quick, easy, and comforting. This pie tastes like you're eating thick and creamy soup with a buttery crust on top. Instead of your usual individual pot pie this pie is family style! Its all cooked in one dish and can simply be scooped into bowls when you're ready to serve. I based this loosely off of Ina Garten's recipe for individual pot pies,because she's the very best! But, I added some extra ingredients and a few of my own twists to make this perfect for a weeknight family dinner!

Chicken Pot Pie 

-serves 6- 

1 sheet store bought puff pastry 

3 tablespoons butter

2 boneless, chicken breasts  

1 onion finely chopped 

1/2 cup celery chopped

1/2 cup flour

2 1/4 cups chicken stock  

1 cup chopped carrots 

1 cup mushrooms cut into bite size pieces 

3-4 sprigs of thyme 

salt and pepper 

1 egg

1 tablespoon milk

To begin, take your puff pastry out of the freezer an hour or so before you start making dinner so it can thaw as you cook the filling. Preheat your oven to 350 degree and start the filling by beginning with your chicken. Put 2 tablespoons of butter in a pan on medium high heat and salt and pepper the 2 chicken breasts. Once the butter has melted, place the chicken in the pan and cook it for about 4 minutes on each side, or until just cooked through - (remember, it will have time to cook in the oven, as well, if it's underdone). After your chicken is cooked, remove it from the pan and set aside.  Add your remaining tablespoon of butter with the finely chopped onion and the celery. Let the two cook until they are soft and translucent, about 5 minutes on medium low heat. Next, add your 1/2 cup flour to the onions, celery and butter. Stir the flour in so it is incorporated with the butter and moisture from the veggies, then add the 2 1/4 cups of chicken stock, turning your heat up to medium high. Stir the stock in with the flour mixture and it will slowly begin to thicken and bubble.  As it does, add the carrots and mushrooms and the leaves off of 3-4 sprigs of thyme. Once it has thickened and come to a boil, turn the heat off and taste for seasoning, adding salt and pepper if needed. Lastly, chop up your previously cooked chicken and stir it into the pot. It will look like this... 

IMG_2521.jpg

Finally, pour your filling into a pie dish. Place the pie on a sheet tray because it may bubble over in the oven. For the crust, simply unfold the puff pastry and lay it across the top of the pie. Cut around the edges so it fits your pie dish just right and cut a couple slits in the top of the dough. Lastly, whisk 1 egg with a tablespoon of milk and brush it over the crust. This will ensure a golden, yummy color on the crust. Bake at 350 degrees for 35-45 minutes, or until the filling is bubbly and the crust is cooked through.

IMG_2592.jpg

This is such a cozy, yummy dinner for any night of the week and it will make your house smell delicious! Just dish it into bowls with a simple side salad and dinner's ready. Happy Fall! 


In savory, recipes Tags pie, fall, holiday, main dish
2 Comments

Hi, I'm Ally, author of Fig and Berrie. Thanks for visiting! 

Learn More
“People who love to eat are always the best people.”
— Julia Child

Follow on Instagram @figandberriekitchen

A bit of summer on this cold December day. I finally, about 6 months late, got this cake on the blog.🙈 So... merry Christmas, enjoy this sunny scene! ☀️🎄 .
.
.
.
.
. #figandberrie #cake #bonappetitmag #f52grams #christmasbaking #foodblog #foodblogf
Happy 4th of July!🇺🇸 here’s a pretty picture of a garden cake to celebrate! 📷: @ellanewmanphoto
.
.
.
.
.
.
. #foodandwine #food52 #bonappetit #foodblog #foodblogfeed #feedfeed #figandberriekitchen #figandberriesummer #fourthofjuly #summerfo
When my grandpa was a little boy his mom made these cookies for him. They have always been my grandpas favorite and my grandma has made them for him all through their marriage. My mom now makes them for my dad and our family, and we think they are pr
A delicious simple dinner/appetizer/snacking board is on the blog with an amazing green goddess dressing from the Tartine All Day cookbook! Link in profile✨
.
.
.
.
.
.
. #figandberriekitchen #foodblogger #foodblogfeed #eatmoremagic #f52grams #bonapp
I’m ready for spring! So a new recipe for a simple, healthy, springtime dinner is coming to the blog soon!
.
.
.
.
.
.
.
. #figandberriekitchen #foodblogger #food52 #f52herbs #foodblogfeed #bonappetit #feedfeed #foodphotography #foodie #foodand
Valentines is almost here💘 I’ve been looking back at this pretty shoot I did with @ellanewmanphoto and remembering these delicious 🍫waffles!! They are so easy and the perfect valentines treat. Link in profile✨❤️
.
.
.
.
.
.
. #figandberrie #f
I swear this is the last picture of raspberries! But these guys are officially up on the blog and the perfect Valentines treat.❤️💕❤️
.
.
.
.
.
. #food52 #foodblogger #buzzfeedfood #foodblog #feedfeed @thefeedfeed #foodblogfeed #bhgfood #countrylivin
It’s finally February! I thought we’d never make it. January felt like the longest month, so here’s a picture of berries to celebrate✨
.
.
.
.
.
.
. #food52 #foodblogger #foodphotography #foody #feedfeed #buzzfeedfood #marthastewart
One of my favorite memories is going to Bear Lake every summer and eating lots of chocolate covered raspberries! It was the best treat and something I never had anywhere else. So I decided to try and recreate them at home, and I can’t stop eati
This salad has been on repeat in our house since Christmas! It’s the perfect combination of flavors, and is now up on the blog! Link in profile✨🥑🍊
.
.
.
.
.
.#foodblogger #buzzfeedfood #food52 #foodie #foodphotography #foodandwine #feedfeed #

FEATURED RECIPES

Popovers
Popovers
Mint Slush
Mint Slush
Christmas Cake
Christmas Cake
Party Cheeseboard
Party Cheeseboard
You must select a collection to display.

Powered by Squarespace                            

Privacy Policy